Growing your own sprouts at home is a fun and practical way to get some fresh, whole food into your diet. And it’s surprisingly approachable too. You may have seen a few jars on kitchen counters with little green shoots poking out from damp towels, or you have a friend bragging about growing microgreens in a week or less. The great thing about sprouts is that they’re inexpensive, fresh, and you can even grow them in a small urban kitchen. You can add them to everyday salads, sandwiches, and wraps, and they’re usually ready in just a few days. Our guide will walk you through how to make sprouts at home, whether you’re looking to sprout beans and seeds or you want to get into microgreens and are interested in growing sprouts from the pot. The good news is you can start today! It’s a small habit that adds nutrition without clutter, making sprouts a quick win for weeknights and snacks alike.
Why Grow Sprouts at Home?
People sprout at home for three practical reasons:
- Health. Sprouts deliver nutritional plant power in a compact package. A quick hit of vitamin C, folate, and other minerals can appear in a small portion. Enzymes formed during germination can aid digestion, and the crunchy texture makes salads and sandwiches more interesting. It’s not a magic cure, but sprouts tend to complement a balanced diet well. Some sprouts may be more nutrient-dense than their mature counterparts, though it varies by seed. It’s worth experimenting with different sprouting beans and seeds to see what your body responds to best.
- Cost. The cost per serving of sprouts can be surprisingly low, especially when you compare them to ready-made greens. A small bag of mung beans or alfalfa seeds can yield several cups of sprouts. Sprouting your own seeds means you’ll often pay less per ounce than most fresh greens, and you can harvest exactly when you need them.
- Freshness. You can harvest sprouts in about 3-7 days, depending on the variety, and enjoy peak flavor. Space helps here too, as a single 1-quart jar and a bit of sunlight can supply weekly greens with minimal clutter.
Of course there are safety tips to keep in mind, but they’re not hard to follow. With clean equipment and proper rinsing, sprouting at home can be both safe and enjoyable.
What Are Sprouts?
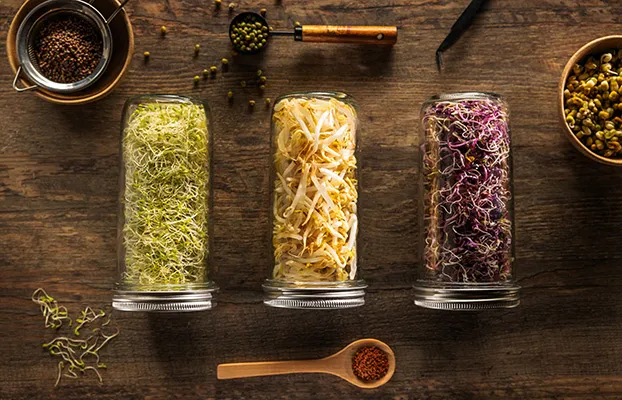
Sprouts are young shoots that grow from seeds, beans, or grains. They differ in how you start them—beans, seeds, or grains—and each type has its own soaking and sprouting needs. Beginners often start with easy options like mung beans or alfalfa, then branch out to lentils, chickpeas, or broccoli seeds. You’ll notice differences in texture, taste, and crunch depending on the variety of sprouting beans or seeds. This section covers the basics so you can begin with confidence and even try growing sprouts in pots if you prefer soil-based sprouting.
Popular Sprouting Beans & Seeds
Here are a few beginner favorites to get you started. Some varieties of sprouting seeds are easier in jars, while others shine when grown in a tray or pot. A quick reference below shows common options, approximate soak times, sprouting times, and typical flavor notes. Sprouting beans like mung beans are mild and fast; alfalfa is light and crunchy; broccoli seeds offer a peppery bite. Lentils bring a hearty texture, and chickpeas yield a nutty, substantial bite. As you try them, you’ll discover what you enjoy most.
| Sprouting beans and seeds | Soak Time | Sprouting Time | Flavour & Texture |
| Green bean sprouts | 6-8 hours | 3-5 days | Light, crisp, clean |
| Alfalfa sprouts | 6-8 hours | 3-5 days | Very delicate, peppery |
| Green or red lentils sprouts | 6-8 hours | 3-6 days | Earthy, crunchy |
| Chickpeas sprouts | 8-12 hours | 4-6 days | Nutty, substantial |
What You Need to Start Sprouting at Home
Getting set up is simpler than you might expect. Start with a few common items, and you can grow sprouts in a jar, on a tray, or in a small pot. The goal is to keep things clean, simple, and space-efficient. Here’s our practical starter list for growing sprouts:
- A wide-mouth 1-quart jar.
- A mesh or nylon sprouting lid.
- A fine-mesh sieve.
- A shallow tray or 6-8-inch pot with drainage.
- A damp towel or a food-grade lid can cover the jar during growth.
- A clean bottle brush helps with quick cleaning.
- A measuring spoon to keep soak times consistent.
- A small pot with breathable soil if you prefer soil-based sprouting.
Step-by-Step Guide: How to Make Sprouts at Home
You’ll notice that a clear sequence makes sprouting easier. The steps below are practical and repeatable, so you can build confidence quickly. If you’re unsure, start with mung beans or alfalfa for a fast, forgiving experience. You’ll be surprised how fast you can see results with consistent practice.
Step 1 – Soaking the seeds/beans
Beans usually need 8-12 hours of soaking, while seeds may require 6-8 hours. Set a timer to track soaking times so you don’t over- or under-soak. Rinse briefly after soaking and drain well before the next step. After a few rounds, you’ll have the cadence down and know what works best for your kitchen.
Step 2 – Draining and rinsing
Hygiene matters as mold can spoil a batch quickly. Rinse your beans or seeds thoroughly with cool water, then drain until you no longer see droplets. Do this twice daily for most small seeds and beans, adjusting if your home is particularly dry or humid. A clean jar makes a big difference later in the process. Sanitation now saves trouble later, and it’s often about moisture management. With a few careful steps, you’ll see steady progress.
Step 3 – Growing and caring for sprouts
Keep sprouts in indirect light or partial shade during growth; too much sun can scorch delicate greens. Rinse twice daily to maintain surface moisture and reduce the risk of slimy growth. You’ll start to see tails appear within a few days, with timing varying by seed type. Air circulation matters, so don’t seal jars tightly or trap moisture in a bag. Sprouting beans and other varieties can be forgiving when you establish a routine and keep temperatures steady.
Step 4 – Harvesting and storing
Harvest when the sprouts reach your preferred length and texture, usually 3-7 days depending on variety. Give them one final rinse, drain well, and pat dry before storage. Store sprouts in a clean sealed container in the refrigerator, ideally in the crisper for a few extra days. Use within 1 week for best texture and flavor, though some varieties hold a bit longer. Proper storage helps maintain crunch and nutrition, so you can enjoy fresh sprouts all week.
Growing Sprouts in Pots: A Simple Alternative
If counter space is tight or you simply prefer soil-based growing, try growing sprouts in pots. This method works well for larger seeds like sunflower and pea shoots and tends to yield a sturdier product. Soil-based sprouting can feel like a small project, but it fits nicely on a sunny windowsill or a balcony. You may find the pot method gives a different texture and flavor than jar sprouts, especially when you want a greener bite with a bit more bulk. It can be a refreshing change of pace that keeps the process tactile from start to finish.
Troubleshooting & Common Mistakes
- Mold shows up as fuzzy growth on surface-moist areas; it often means airflow is lacking or the batch is too wet.
- Seeds that won’t germinate could be due to soaking or seed freshness, so when germination stalls, check the soak time, rinse frequency, and whether the seeds you used are fresh.
- Over-soaking can lead to slimy sprouts that smell off; so slow down the water cadence, ensure proper drainage, and choose a cooler, brighter spot.
Best Sprouting Beans and Seeds to Try First
For beginners, it helps to have a short list of reliable options. The quick table below highlights soak time, expected sprouting time, and taste so you can plan meals with confidence. Use these as a starting point, then branch out as you gain experience. Remember: every seed behaves a little differently, so be patient and take notes.
Keep a notebook handy. Track soak times, rinse frequency, and the day you see sprouts. Mung beans pair well with greens and sesame in stir-fries. Alfalfa adds a crisp bite to sandwiches. Lentils bring heft to bowls and grain salads. Chickpeas yield substantial clusters great for wraps. These options are forgiving and reliable for first timers who want consistent results. Seed Soak time Sprouting time Taste/Texture Best use Mung beans 6-8 hours 3-5 days Crunchy, fresh Salads, wraps Alfalfa 6-8 hours 3-5 days Delicate, peppery Sandwich toppers Lentils 6-8 hours 3-6 days Earthy, chewy Bowls, grain salads Chickpeas 8-12 hours 4-6 days Nutty, substantial Wraps, dips.
| Seed | Soak Time | Sprouting Time | Taste/Texture | Best Use |
| Mung Beans | 6-8 hours | 3-5 days | Crunchy, Taste | Salads. Wraps |
| Alfalfa | 6-8 hours | 3-5 days | Delicate, peppery | Sandwich toppers |
| Lentils | 6-8 hours | 3-6 days | Earthy, chewy | Bowls, grain salads |
| Chickpeas | 8-12 hours | 4-6 days | Nutty, substantial | wraps dips |
Frequently Asked Questions About Growing Sprouts
- How do you sprout beans at home without a sprouter?
You don’t need a sprouter as you can sprout beans using a wide-mouth jar, a mesh lid, and a simple rinse-and-drain routine. Simply soak the beans, drain, rinse twice daily, and prop the jar at an angle to promote airflow.
- Is it safe to eat raw sprouts grown at home?
Raw sprouts can be safe when prepared and stored properly. Start with clean equipment and seeds from reputable suppliers. Rinse thoroughly and refrigerate promptly after harvest. If you’re pregnant, immunocompromised, or feeding young children, you may want to cook sprouts lightly to reduce risk.
- How long does it take for seeds to sprout?
Timing varies by seed and conditions. Some sprouts appear in about 3 days; others may take up to 7 days. Temperature, light, and rinse frequency all play a role. Keeping a small log of batches helps you predict harvest days and plan meals.
- What are the best jars or containers for sprouting?
A 1-quart wide-mouth jar with a mesh lid is the classic starter. You can also use a shallow tray or a pot with drainage for soil-based sprouting. The key is good airflow, easy rinsing, and thorough drainage. Avoid jars with tight lids that trap moisture.
- Can you grow sprouts in pots indoors?
Yes. Pots let you grow larger sprouts like sunflower or pea shoots in a compact space. Use well-draining soil and a bright window (but not direct sun all day) to encourage sturdy growth. Water consistently without overwatering. Pot-grown sprouts—also known as microgreens—offer a different texture and flavor profile than jar sprouts.
- How should I store sprouts after harvest?
Rinse sprouts, pat them dry, and store them in an airtight container in the refrigerator. They stay fresh for about a week. If you notice off smells or discoloration, discard the batch.
Final Thoughts on Growing Sprouts at Home
Sprouting at home is approachable, affordable, and adaptable to many kitchens. Start with a few seeds and a jar, then explore soil-based pots if you want more texture and variety. The process rewards a routine that fits your schedule, not the other way around. Use fresh seeds, clean equipment, and steady rinsing to enjoy consistent harvests. Give it a try with easy beans or seeds first, and you’ll likely find a crunchy, vibrant addition to meals that feel good for your body, your wallet, and your taste buds.


